UILabel Alignment
디자이너 분들과 일할 때 AutoLayout Constraint 를 제대로 걸었음에도 "중앙정렬이 안맞는 것 같아요. 여기 텍스트 정렬이 어색해요" 와 같은 얘기를 들을 때가 종종 있었습니다. 실제로 UILabel 은 지정한 Font 크기보다 크게 잡히며 중앙정렬이 안되어 있는 것처럼 보였습니다. 이와 관련해서 왜 더 크게 잡히는지, 정렬이 어떤 식으로 동작하는지, Font 가 Label 에 어떤 영향을 미치는지 간단한 용어와 개념부터 소개하겠습니다.
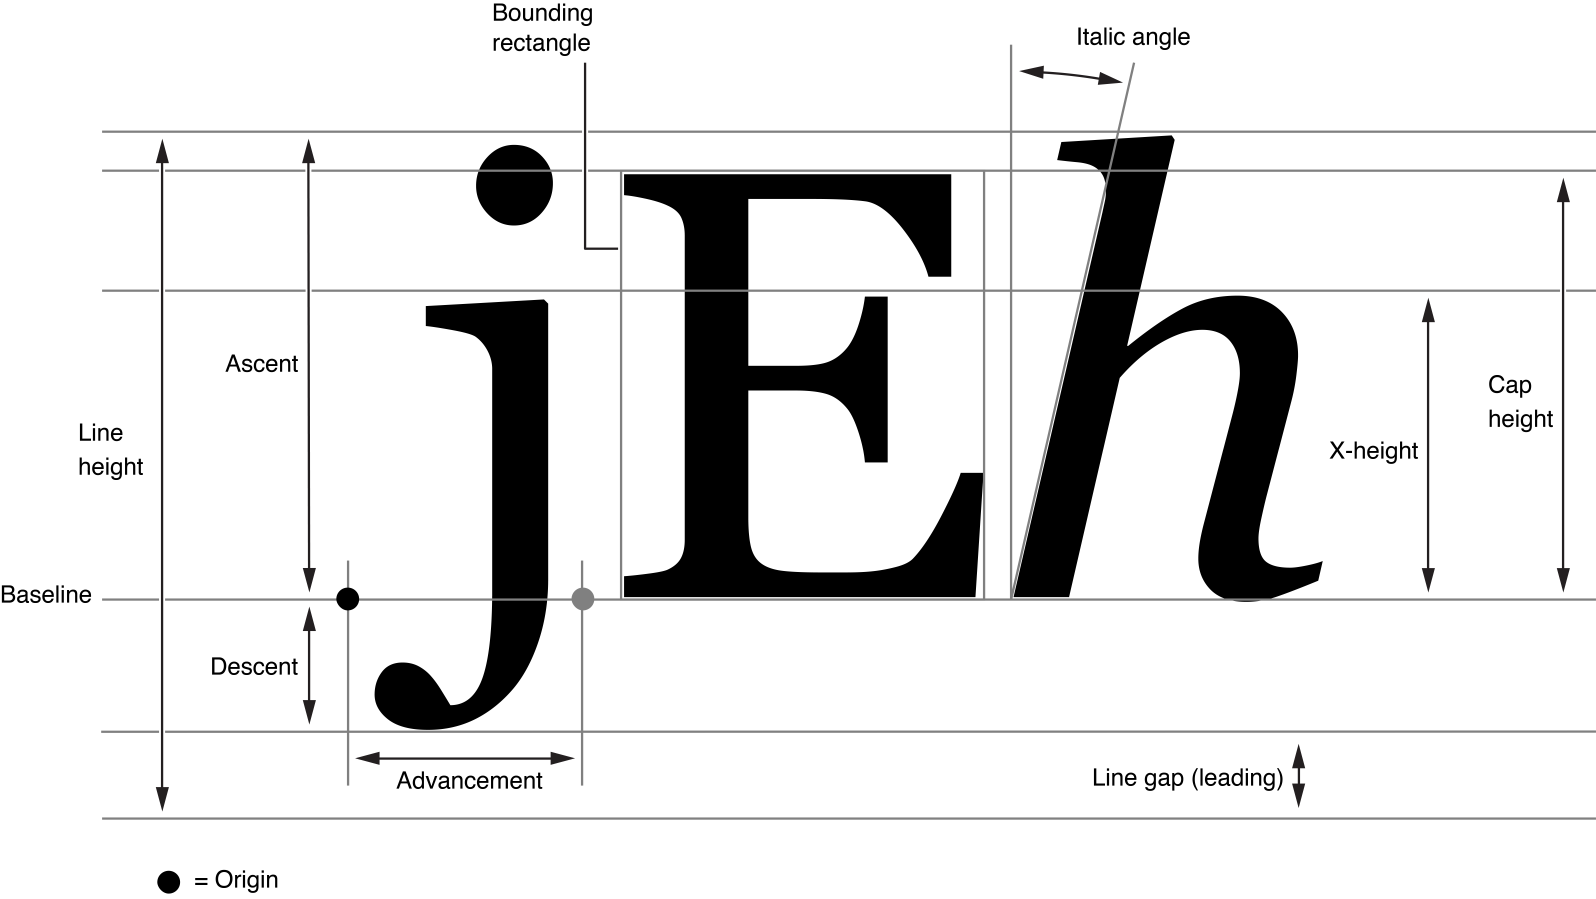
정렬이 왜 이상한지를 설명하기에 앞서 먼저 용어를 알고 갈 필요가 있습니다. 아래 보이는 이미지는 애플 문서 Font Handling 에 있는 이미지로 글자를 그릴 때 필요한 선들을 나타냅니다.

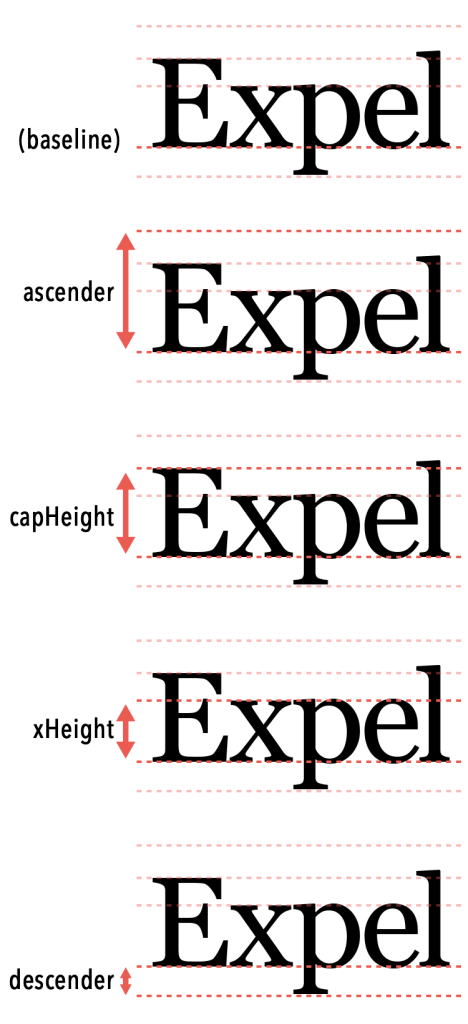
많은 용어들이 있음에도 이 글에서 필요한 Baseline, Ascent(Ascender), Descent(Descender), CapHeight, x-Height, LineHeight, Leading(Line gap) 정도만 알면 됩니다.

먼저 Baseline 은 문자가 서있는 보이지 않는 선입니다. 이 선을 기준으로 문자들을 만듭니다.
Ascent(Ascender) 는 Baseline 으로부터 문자의 가장 윗 부분까지 거리를 나타냅니다.
Descent(Descender 는 Baseline 으로부터 문자의 가장 아랫 부분까지 거리를 나타냅니다. 여기서 줄간격 Leading은 포함하지 않습니다.
CapHeight 는 basline 으로부터 대문자가 차지하는 높이, x-Height 는 baseline 으로부터 소문자 x 가 차지하는 높이입니다.
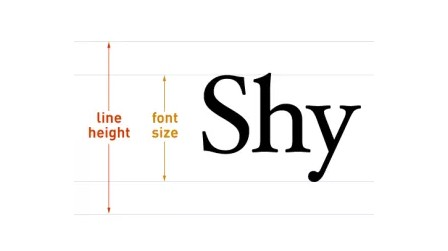
LineHeight 는 한 줄이 차지하는 높이를 말하며, 애플 문서에 있는 그림은 줄간격 Leading 을 포함하고 있습니다.
허나 실제로 iOS 개발에서는 포함되지 않습니다. 그래서 LineHeight 는 Ascent + Descent 의 합이 됩니다.
What If Your Designers Want a Baseline Grid on iOS? 글을 참조하여 여러 TextStyle 의 정보를 출력하면 LineHeight 에 Leading 이 포함되지 않는 걸 알 수 있습니다.
예를 들어 Title 이 lineHeight: 71.6015625, ascender: 57.12890625, descender: -14.47265625, leading: -1.6015624999999956 와 같이 나오면서 lineHeight = ascender + descender 임을 알 수 있습니다.
Alignment Examples
위에서 정의한 개념들을 통해 몇몇 문제가 되는 정렬들을 살펴보고 해결해보려 합니다.
Baseline Offset
몇몇 사람들은 디자인의 90%가 타이포그래피 라고 합니다. 그만큼 사람들한테 글을 잘 읽히게 하려면 줄 간격도 중요합니다. 그래서 많은 디자이너 분들이 lineHeight 를 수정하여 가독성을 좋게 만드려고 노력합니다.
let style = NSMutableParagraphStyle()
style.maximumLineHeight = lineHeight
style.minimumLineHeight = lineHeight
let attributes: [NSAttributedString.Key: Any] = [.paragraphStyle: style]
let attrString = NSAttributedString(string: text, attributes: attributes)
self.attributedText = attrString
iOS 에서는 위와 같이 코드를 작성하여 원하는 lineHeight 를 설정할 수 있습니다.

출처: UILabel line height in Swift
근데 위 이미지와 같이 문자들이 중앙정렬 되는 게 아니라 아랫부분에 붙어 있어서 예상치 못하게 상단 부분이 비어 보일 수 있습니다. 여러 줄의 UILabel 을 화면 중앙에 정렬해도 상단이 비어보이면서 중앙 정렬이 아닌 것처럼 보일 수 있습니다.
// 출처: https://stackoverflow.com/questions/19487369/center-two-fonts-with-different-different-sizes-vertically-in-an-nsattributedstr
let smallStr = "Hello"
let bigStr = "World"
let fullStr = NSMutableAttributedString(string: "\(smallStr) \(bigStr)")
let smallStrRange = NSMakeRange(0, smallStr.count)
let bigStrRange = NSMakeRange(smallStr.count + 1, bigStr.count)
fullStr.addAttributes([NSAttributedString.Key.font: UIFont.systemFont(ofSize: 28)], range: smallStrRange)
fullStr.addAttributes([NSAttributedString.Key.font: UIFont.systemFont(ofSize: 42)], range: bigStrRange)
또 다른 상황으로 NSAttributedText 에 다른 Font 크기를 지정하면 baseline 을 기준으로 정렬됩니다.

출처: UILabel line height in Swift
왼쪽 이미지가 아닌 오른쪽 이미지처럼 중앙 정렬을 원하는 경우는 어떻게 해야 할까요?
Solution - baselineOffset
위와 같은 문제들을 NSAttributedString 의 baselineOffset 설정으로 해결할 수 있습니다. 문자들을 Baseline 으로부터 간격을 주어서 중앙에 정렬하는 것처럼 보이게 합니다.

출처: UILabel line height in Swift
baseline offset 은 Baseline 으로 부터 얼마나 떨어져 있는 지를 나타냅니다. 설정한 lineHeight 에서 Font 크기를 빼고 나누기 2 한 값을 offset 으로 설정하면 될 것 같습니다.
// offset 을 (custom line height - font.lineHeight) / 2 로 줘야 할 것 같지만
// (custom line height - font.lineHeight) / 4 를 줘야 중앙에 배치한다.
let attributes: [NSAttributedString.Key: Any] = [
    .paragraphStyle: style,
    .baselineOffset: (lineHeight - font.lineHeight) / 4
]
하지만 실제로는 나누기 2 가 아닌 나누기 4 를 해야 중앙 정렬이 됩니다. (내부적으로 scale 계산을 하는 건지, 여러 블로그글을 참고했으나 아직까지 정확한 사유를 파악하지 못했습니다.)

출처: UILabel line height in Swift
- 첫번째 이미지는 baselineOffset 을 적용하기 전,
- 두번째 이미지는 baselineOffset 을
(lineHeight - font.lineHeight) / 4으로 적용한 상황 - 세번째 이미지는 baselineOffset 을
(lineHeight - font.lineHeight) / 4을 적용하고(lineHeight - font.lineHeight) / 2를 이용하여 빨간 선을 그려주었습니다.
CapHeight Alignment
다음은 Font 크기가 다른 두 UILabel 을 상단으로 맞추는 경우 입니다.

Font 크기가 다른 두 UILabel 상단을 맞췄음에도 불구하고 왼쪽 이미지처럼 실제로 보이는 글자 정렬은 이상해보입니다. 오른쪽 처럼 이쁘게 정렬되게 하려면 어떻게 해야 할까요?

왼쪽 이미지 처럼 UILabel 의 상단을 맞추는 것이 아닌 CapHeight 선을 맞추면 오른쪽 그림처럼 깔끔하게 해결할 수 있습니다.
// 두 UILabel 의 상단에 있는 빈공간의 차를 `Minute` UILabel top constraint 값으로 넣어준다.
minuteLabelTopConstraint.constant =
  (twentyFiveLabel.font.ascender - twentyFiveLabel.font.capHeight)
  - (minuteLabel.font.ascender - minuteLabel.font.capHeight)
가장 쉬운 구현으로는 위 코드 처럼 두 UILabel 의 상단을 맞추던 AutoLayout Constraint 에 (Ascender - CapHeight) 차이를 설정하는 방법이 있습니다.
// 출처: https://www.atimi.com/cap-height-alignment-for-ios-auto-layout/
// View "top alignment" 의 정의를 바꾼다. cap height 를 이용하여 쉽게 해결할 수 있다.
override var alignmentRectInsets: UIEdgeInsets {
    var insets = UIEdgeInsets.zero
    if alignCapHeight {
        insets.top = round(font.ascender - font.capHeight)
    }
    return insets
}

// Boolean 을 정의하여 사용자가 쉽게 껐다켰다 할 수 있게 개발할 수 있다.
var alignCapHeight: Bool = false {
    didSet {
        // As the alignment method is only called during layout,
        // We also need to ensure that Auto Layout is rerun whenever the property changes.
        setNeedsUpdateConstraints()
    }
}
다른 방법으로는 UIView 의 alignmentRectInsets 값을 이용하는 방법입니다.
값을 override 하면서 View 내부에서 top 에 대한 정의를 바꿉니다.

위 이미지는 alignmentRectInsets 를 덮어쓰는 CapAlignmentLabel 를 정의하여 비교해본 결과입니다.
왼쪽 이미지는 스토리보드에서의 프리뷰이며 오른쪽 이미지는 실제로 디바이스에서 작동한 결과입니다.
연한 초록색이 CapAlignmentLabel 영역을 나타냅니다.
파란색 View 밑에 25 가 써진 CapAlignmentLabel 를 붙인 후 양 옆에 Label 들을 25 가 써진 CapAlignmentLabel 상단에 맞췄습니다.
font.ascender - font.capHeight 만큼 텍스트가 위로 올라간 걸 볼 수 있습니다.
More Accurate CapHeight
좀 더 정확한 위치를 잡기 위해서는 실제로 Text 가 UILabel 에서 어떻게 그려지는 지 파악해 볼 필요가 있습니다. Helvetica Font 24pt 는 lineHeight 27.6, ascender 22.08, descender -5.52, capHeight 17.27 값을 가집니다. iOS 에서는 실제로 Text 를 그릴 때 이러한 Fractional part(pxiel 영역으로 나눠지지 않는 값들)를 anti-aliasing 을 사용하여 그립니다.
![]()
출처: Cap Height Alignment for iOS Auto Layout
글자들은 Baseline 위에서 그려지는데, 이 Baseline 은 pixel 영역이라서 Fractional part 를 pixel 영역에 맞게 처리해야 합니다. 근데 여기서 round 를 써서 실제 글자가 차지하는 pixel 보다 작아지면 잘릴 수도 있으니 ceil 을 이용하여 한 픽셀 정도 넉넉하게 잡아줍니다.
// ceil(lineHeight) = ceil(ascender) + ceil(descender) 는 항상 성립하지 않는다.
// 일반적으로, 많은 글자들이 descender 에 우선순위를 가진다. 그래서 `ceil(lineHeight) – ceil(-descender) – round(capHeight)` 계산식을 이용한다.
override var alignmentRectInsets: UIEdgeInsets {
    var insets = UIEdgeInsets.zero
    // rounding 은 pixel boundary 에서 발생하므로 정확한 계산을 위해 screen scaling 을 고려한다.
    if alignCapHeight, let scale = window?.screen.scale {
        insets.top = (
            ceil(font.lineHeight * scale)
            – ceil(-font.descender * scale)
            – round(font.capHeight * scale)
        ) / scale
    }
    return insets
}
Baseline Alignment
또한, iOS 에서 firstBaselineAnchor, lastBaselineAnchor 를 Auto Layout 으로 제공하여 Baseline 에 맞게 정렬할 수 있습니다.
// 출처: https://milyo-codingstories.tistory.com/51
let baseLabel = UILabel()
baseLabel.text = "Base Label\nBase Label\nBase Label"
baseLabel.lineBreakMode = .byWordWrapping
baseLabel.numberOfLines = 0
NSLayoutConstraint.activate([
    baseLabel.leadingAnchor.constraint(equalTo: view.safeAreaLayoutGuide.leadingAnchor,constant: 8),
])

let newLabel = UILabel()
newLabel.text = "new"
NSLayoutConstraint.activate([
    newLabel.leadingAnchor.constraint(equalTo: baseLabel.trailingAnchor,constant: 8),
    // Baseline 정렬
    newLabel.topAnchor.constraint(equalTo: baseLabel.firstBaselineAnchor)
])

출처: FirstBaseLineNachor & LastBaseLineAnchor
"new" Label 상단을 "Base Label" 의 firstBaselineAnchor 에 걸게 되면 왼쪽 이미지와 같이 나타납니다. 오른쪽 이미지는 lastBaselineAnchor 를 이용했습니다.
Conclusion
이번 글에서는 Font 에서 쓰이는 간단한 개념들과 그 개념들을 어떻게 이용할 수 있는 지를 정리해봤습니다. 개발을 하면서 이상항 정렬로 Typography 에 대해 공부해봐야겠다고 생각했던 적이 있었는데, 간단한 용어만 알아도 실무에서 요구하는 디자인 문제는 어느 정도 해결할 수 있을 것 같습니다. 가독성을 위해 LineHeight 를 직접 설정하는 경우, Font 크기가 다른 두 Label 을 정렬하는 경우는 꽤 빈번해서 위에서 설명한 개념들을 유용하게 쓸 수 있을 것 같습니다.